This tutorial shows you how to access the HTTP API through the cURL command line tool, a browser, and a browser-add on like RESTClient or PostMan. If you learn better by seeing a demonstration, you'll find some videos embedded in this tutorial.
Provision the IBM Cloudant Service in Bluemix
If you do not already have the IBM Cloudant service provisioned in Bluemix, follow these steps to provision the service. ▼More
If you don't have a Bluemix account, click Sign Up. Complete the fields on the form, and click Create Account.
If you have a Bluemix account, click Log In. Provide your IBMid and password, and click Log In.
In the top navigation bar, click Catalog.
In the left navigator, under Services, check Data and Analytics.
Click Cloudant NOSQL DB.
Accept the default service, or provide a different name, and click Create. This brings you to the IBM Cloudant Bluemix Service Launch Page.
Click Service Credentials. Note your username, password, and host name. You will be able to use the URL (which also passes your username and password) to access your database from a browser.
Paste the value for your username here:
Click this button to update the URLs for the rest of this tutorial.
Click Manage.
Click Launch to load the Cloudant dashboard.
Tools to Work With the API
Video: Tools to work with the HTTP API
As you walk through the tutorials on this page, you'll learn about some tools that help you work with the API. For a quick overview of these tools, watch this short video introduction. Each tutorial contains the links for installing each of the tools. ▼More
Set up pre-authenticated cURL
IBM Cloudant includes a RESTful API to create, read, update, and delete documents in your database. To interact with your database using the API, you'll use cURL along with your username and password.
Video: Set up pre-authenticated cURL
This short video shows you how to set up a pre-authenticated version of cURL so you don't need to supply your user credentials every time you issue a cURL command. ▼More
Tutorial: Set up pre-authenticated cURL
This tutorial shows you how to set up a pre-authenticated version of cURL so you don't need to supply your user credentials every time you issue a cURL command. ▼More
Before you begin
The tutorial requires a unix shell, native on MacOS, and available through tools such as Cygwin on Windows.
cURL: You'll also need the cURL command line tool which you can download from here cURL .
jq: You can optionally install jq which helps you by formatting the JSON response.
Cygwin: On Windows, you can install both cURL and jq as packages in Cygwin. Make sure the cygwin directory is included in the PATH environment variable.
Set up a preauthenticated version of cURL
Open a cURL command line window.
Base64-encode your Cloudant username and password using the following command.
curl –v –u <account> 'https://<account>.cloudant.com'
Edit the .bash_profile or .bashrc file in any text editor. For example, from the command line, issue the following command:
open –e .bash_profile
Add the following line to the file, then save the file.
alias acurl="curl -s --proto '=https' -g -H 'Authorization: Basic <output-of-base64>'"
Restart the shell command line window.
Issue a command using the new alias. For example, issue a command to view your account information.
acurl -X GET 'https://<account>.cloudant.com'
Execute Basic HTTP API Commands
Learn how to run some common HTTP API commands to create, read, update, and delete data in a Cloudant database using the command line, a browser, and a browser add-on tool.
Video: Execute Basic CRUD Commands
Watch this short video to see how to execute some basic create-read-update-delete commands using the API. ▼More
Tutorial: Access the API using cURL
Try using cURL to access the Cloudant HTTP API and perform basic tasks. ▼More
Before you begin
The tutorial requires a unix shell, native on MacOS, and available through tools such as Cygwin on Windows.
cURL: You'll also need the cURL command line tool which you can download from here cURL . And set up pre-authenticated cURL as described here.
jq: You can optionally install jq which helps you by formatting the JSON response.
Cygwin: On Windows, you can install both cURL and jq as packages in Cygwin. Make sure the cygwin directory is included in the PATH environment variable.
Procedure 1: View account information
Open a command prompt in the Linux shell, and verify that you can run the cURL command by typing curl.
Get information about your account by running the following command.
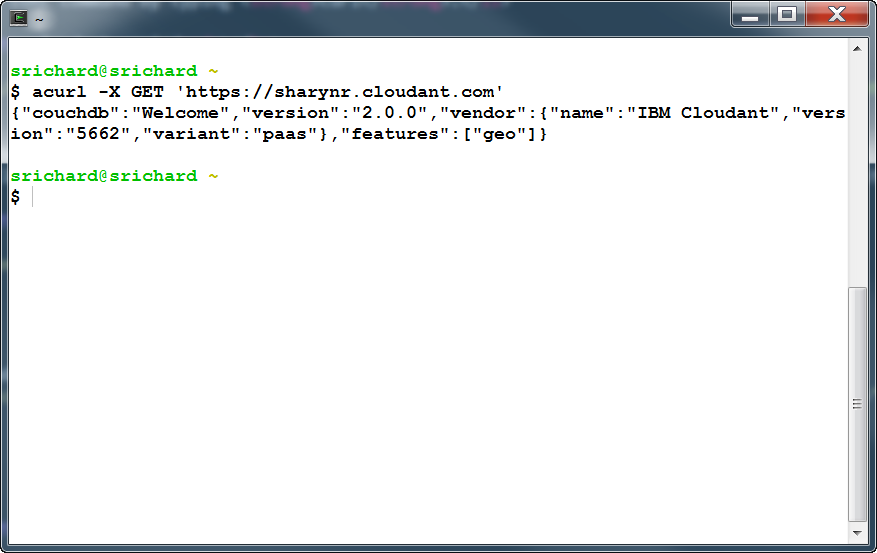
Command: acurl –X GET 'https://<account>.cloudant.com'
Example output:
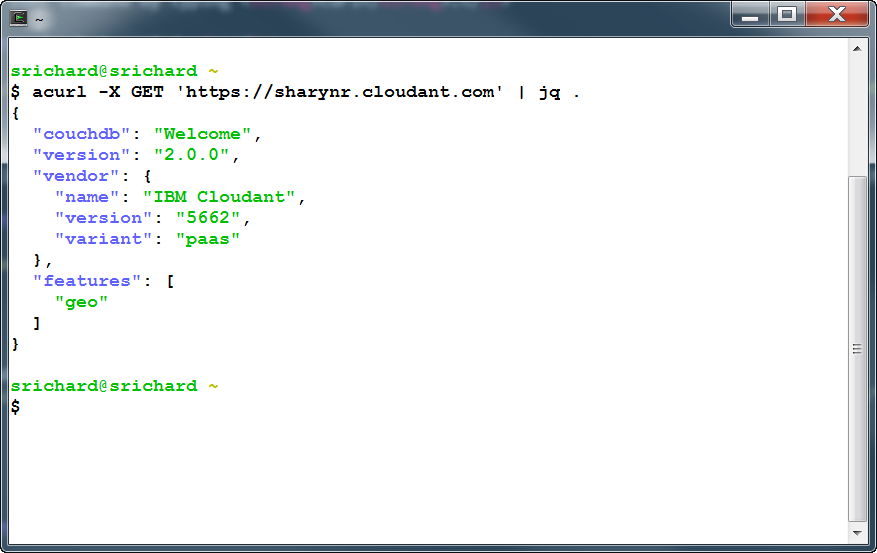
If you have jq installed, run the same command again, piping the output through jq to format the JSON response, and add the ‘-s’ flag to silence additional curl information in the output. ’–X GET’ is the default, so you do not have to include it for GET requests. The response should include the Cloudant build field along with a typical CouchDB response.
Command: acurl -X GET 'https://<account>.cloudant.com' | jq .
Example response:
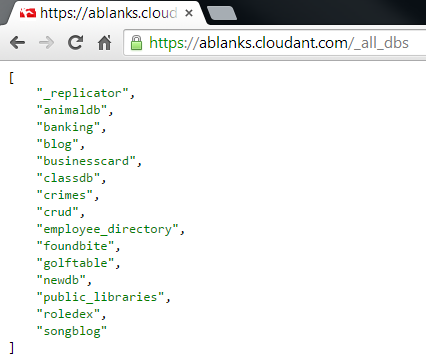
Procedure 2: Getting a list of databases
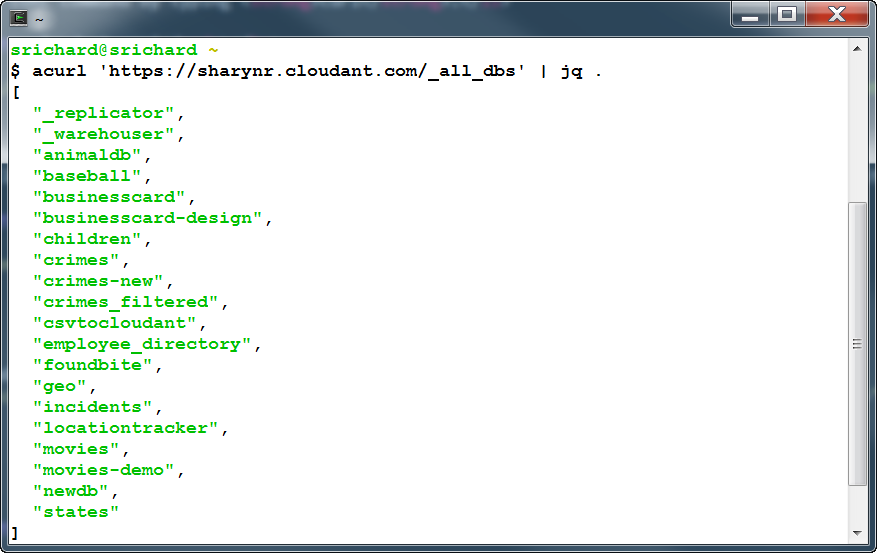
Get a list of databases in your account using the ‘_all_dbs’ endpoint.
Command: acurl 'https://<account>.cloudant.com/_all_dbs' | jq .
Example response:
Procedure 3: Creating a database
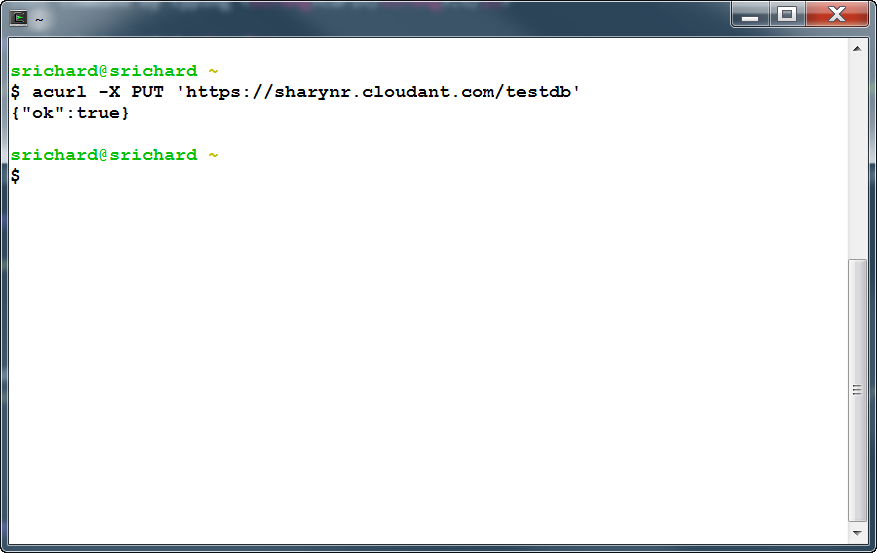
Create a database called testdb using the PUT verb.
Command: acurl –X PUT 'https://<account>.cloudant.com/testdb'
Expected response:
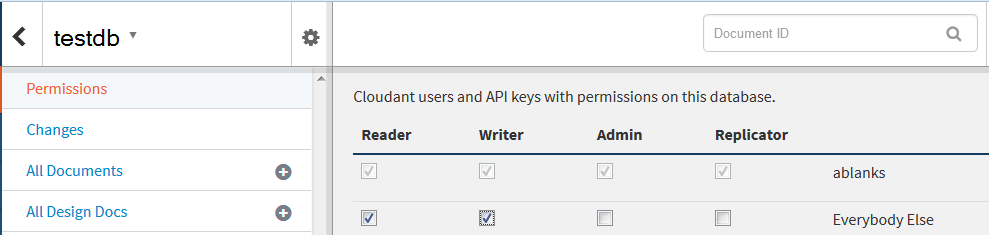
Procedure 4: Using the Dashboard to Set Permissions
To change permissions on the newly created ‘testdb’ database to be world read and writeable to simplify the future tasks, go to the Cloudant Dashboard.
Open the testdb database.
Click Permissions.
Add Reader and Writer roles to Everybody Else as shown below.
Example response:
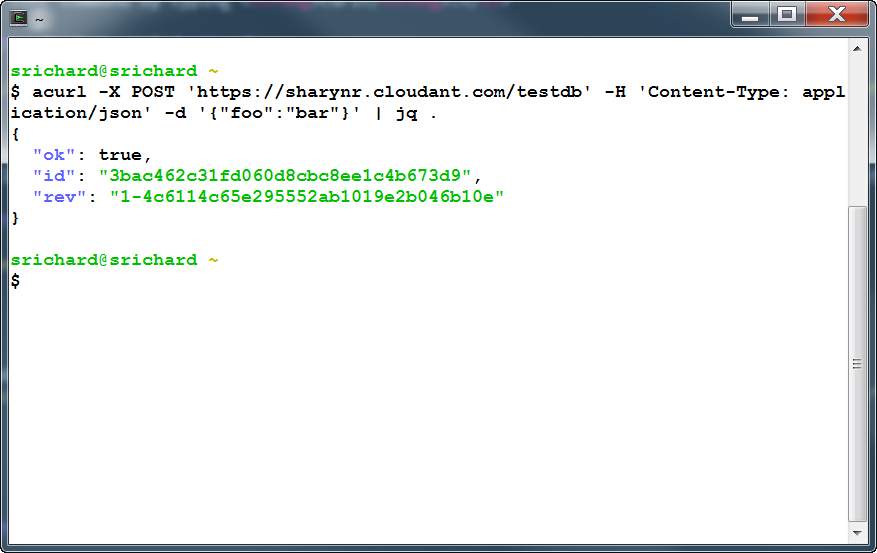
Procedure 5: Creating a document
Create a document in the testdb database using the POST verb against the testdb endpoint. Omit the id, and thereby indicating that Cloudant should auto-generate a unique ID for the document. You must include a header for the Content-Type of application/json and use the –d parameter to pass the JSON document contents. The response should include “ok”: true along with the document _id and _rev.
Command: acurl –X POST 'https://<account>.cloudant.com/testdb' –H 'Content-Type: application/json' –d '{"foo":bar"}' | jq .
Example response:
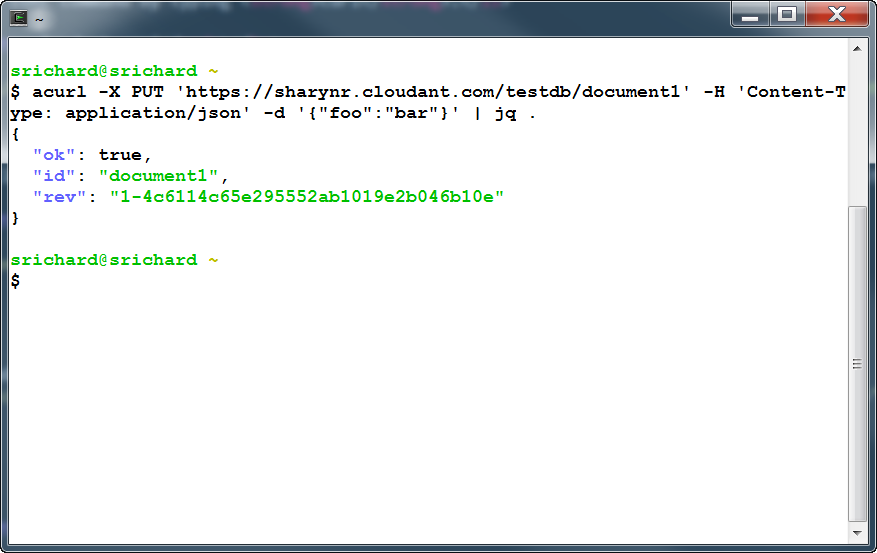
Create a document in the testdb database using the PUT verb against the testdb/<DocID> endpoint. The custom endpoint that you define is used to create the document _id. The following example uses the _id ‘document1’.
Command: acurl –X PUT 'https://<account>.cloudant.com/testdb/document1' –H 'Content-Type: application/json' –d '{"foo": "bar"}' | jq .
Example response:
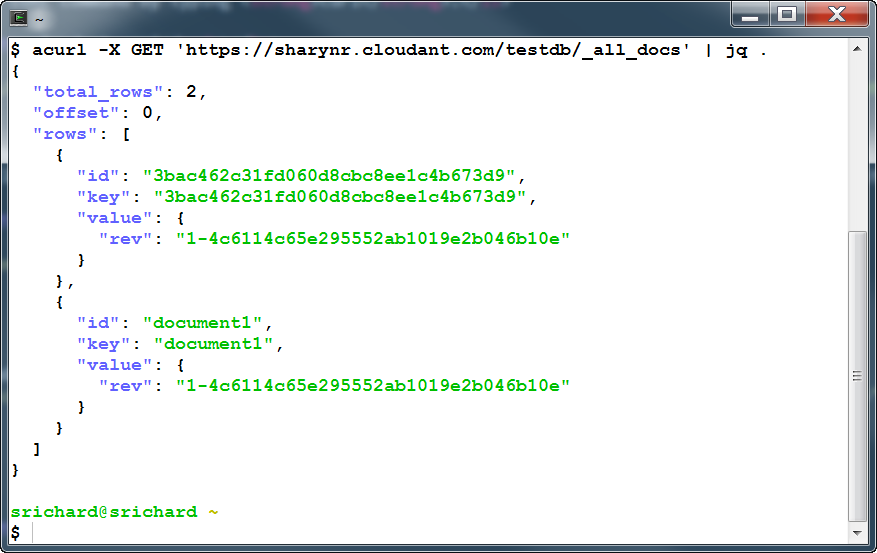
Procedure 6: View and delete documents
View all documents using the ‘_all_docs’ endpoint. This is also known as the Primary Index for a database. The response includes a key, which is the _id of the document in the case of the Primary Index, and a value, which is the latest _rev of the document in the case of the Primary Index.
Command: acurl 'https://<account>.cloudant.com/testdb/_all_docs' | jq .
Example response:
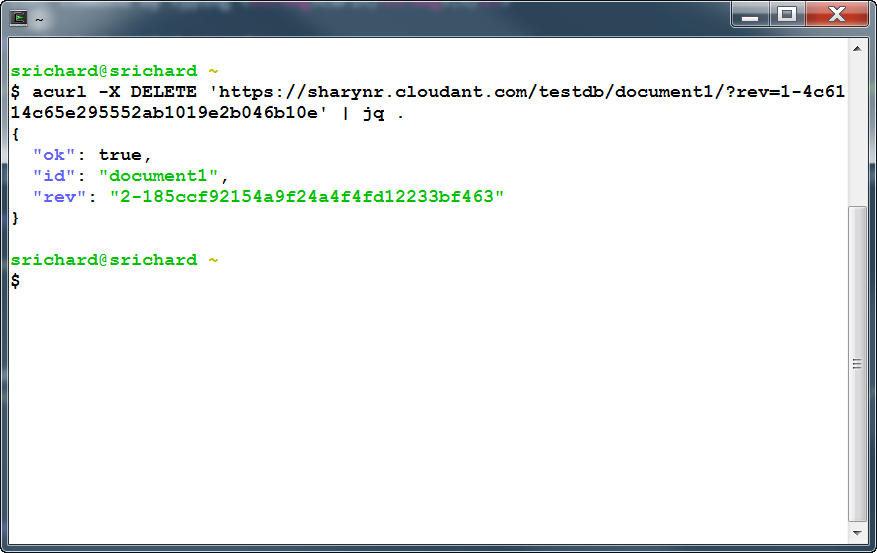
Delete the document that you just created. You need to specify both the document id and the latest rev of the document to delete it. Obtain the rev from the output of the previous step to get ‘_all_docs’.
Command: acurl –X DELETE 'https://<account>.cloudant.com/testdb/document1?rev=<rev>' | jq .
Example response:
Use either Chrome or Firefox for this tutorial and install the JSONView add-on for your browser. This tool lets you see JSON with syntax highlighting, which makes it easier to parse elements and read the code. Get it at:
Replicate the animaldb database from the http://education.cloudant.com account. If you need help creating the replication request, refer to the Replication video and Tutorial on the Create a Replication Job page.
Access API via browser
View your account information.
URL:https://<account>.cloudant.comExample response
View all the databases in your account.
URL:https://<account>.cloudant.com/_all_dbsExample response with JSONView enabled:
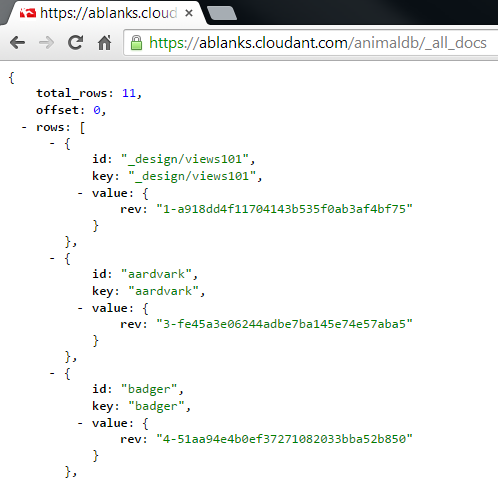
View all the documents in the animaldb database.
URL:https://<account>.cloudant.com/animaldb/_all_docsExample response with JSONView enabled:
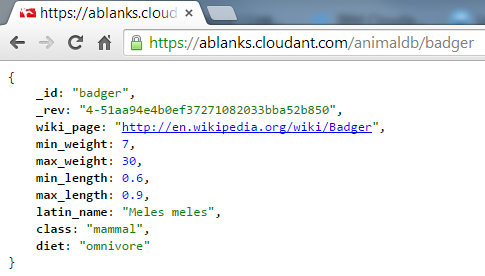
View the badger document in the animaldb database.
URL:https://<account>.cloudant.com/animaldb/badgerExample response with JSONView enabled:
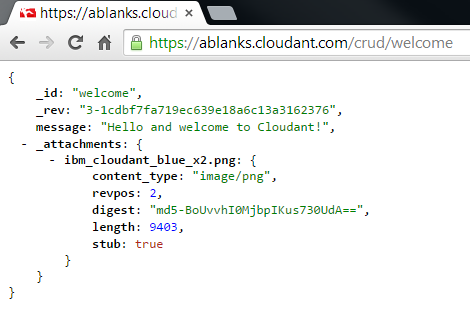
View an image attached to a document. The document is in a database called crud in the ablanks account and has world-readable permissions.
First, look at the document which indicates that there is an image attached to the document.
URL:https://ablanks.cloudant.com/crud/welcomeExample response with JSONView enabled:
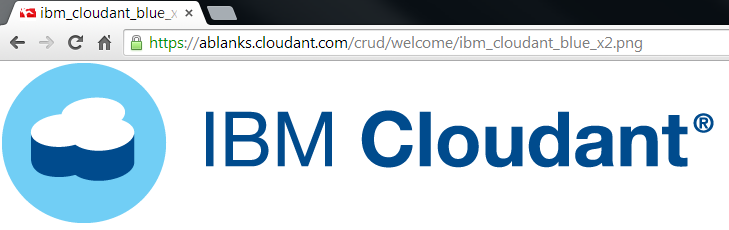
Next, view the attachment.
URL:https://ablanks.cloudant.com/crud/welcome/ibm_cloudant_blue_x2.pngExample response with JSONView enabled:
Tutorial: Access the API using a browser add-on
Try working with the API using a browser add-on tool. ▼More
Follow these steps using Chrome or Firefox.
Install one of the following tools. Both provide an easy user
interface to manipulate the API, like sending requests to the Cloudant database, parsing a response, specifying a URL with credentials to authenticate, or adding headers. If you use:
If you haven't already done so, replicate the animaldb database from the http://education.cloudant.com account. If you need help creating the replication request, refer to the Replication video and Tutorial on the Create a Replication Job page.
Open either RESTClient or POSTMan, and view your account information.
URL:https://<account>.cloudant.comBasic Authentication: Type your username and password. This information will be base64 encoded and passed in the header.
Verb: GET
Example responses in RESTClient and POSTMan:
View all the databases in your account.
URL:https://<account>.cloudant.com/_all_dbsVerb: GET
Example response in POSTMan:
View all the documents in the animaldb database.
URL:https://<account>.cloudant.com/animaldb/_all_docsVerb: GET
Example response in POSTMan:
View the leumur document in the animaldb database.
URL:https://<account>.cloudant.com/animaldb/lemurVerb: GET
Example response in POSTMan:
Create a new database called mynewdb.
URL:https://<account>.cloudant.com/mynewdbVerb: PUT
Example response in POSTMan:
Create a new document in the mynewdb database.
URL:https://<account>.cloudant.com/mynewdbVerb: POST
Raw JSON:{"name" : "William","age" : 50,"gender" : "male","_id" : "William"}Example response in POSTMan:
Create two documents in bulk in the mynewdb database.
URL:https://<account>.cloudant.com/mynewdb/_bulk_docsVerb: POST
Raw JSON:{"docs" : [{"name" : "Sarah","age" : 43,"gender" : "female","_id" : "sarah"},{"name" : "Nancy","age" : 51,"gender" : "female","_id" : "nancy"}]}Example response in POSTMan:
Delete a document in the mynewdb database. Obtain the revID for nancy from the previous reponse.
URL:https://<account>.cloudant.com/mynewdb/nancy?rev=1-b0f9d52c0df68f99db4e05aed5033351Verb: DELETE
Example response in POSTMan: